TV Help
Streaming TV
PlatinumTV compatible devices
Mobile Devices (phones & tablets):
- Android Minimum Version: 8
- IOS Minimum Version: 14
Streaming Devices:
AppleTV:
- Apple TV HD (previously called 4th Gen)
- Apple TV 4K models
Amazon Fire TV:
- FireTV stick 4k
- Note: FireTV Stick 4K 1st Gen (Model AFTMM E9L29Y)has been removed from the Qualified Devices listing as of 5.1.25, due to performance issues.
- FireTV Stick 4k Max
- Fire TV Cube Gen3 (and Gen2)
Rule of thumb: generally models with increased memory and processing power will perform the best. New models that are cheaper and reduce memory and/or processing power, or which support just 30 fps, may not work and are not supported. Examples of non-supported devices are Fire TV Stick Lite and other devices on the lower-end that do not have the power to run PlatinumTV.
Smart TV’s:
Our testing finds that smart TV’s with built-in FireTVs work, but they tend to perform slower than using an external streaming device.
Install PlatinumTV on your Apple streaming device
Experience TV like never before with PlatinumTV. Use your existing supported devices or rent equipment from us. TV has never been simpler!
Step 1: Navigate to the app store on your Apple TV
Step 2: Search for “PlatinumTV”
Step 3: Select “Get”

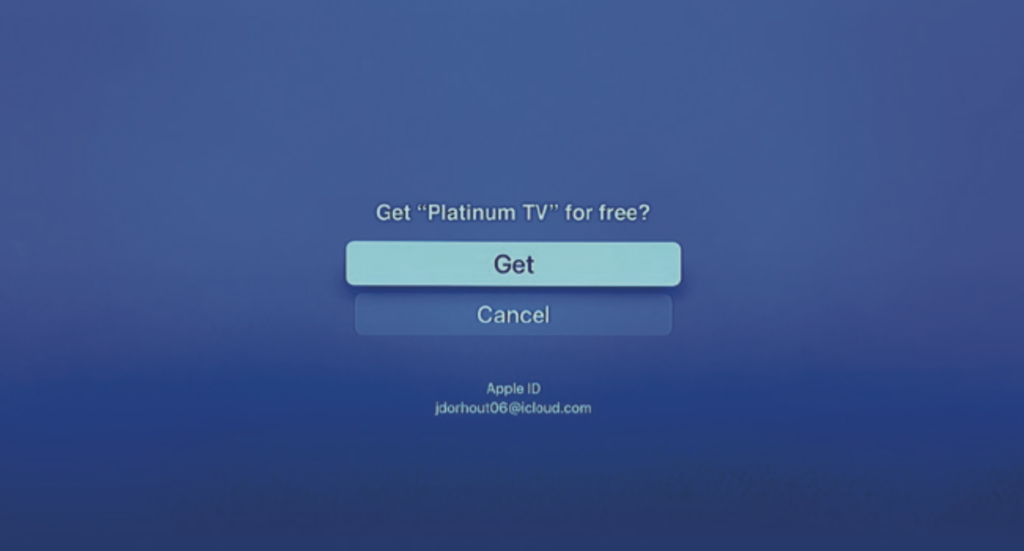
Step 4: You will see the question “Get ‘PlatinumTV’ for free?” Select “Get”
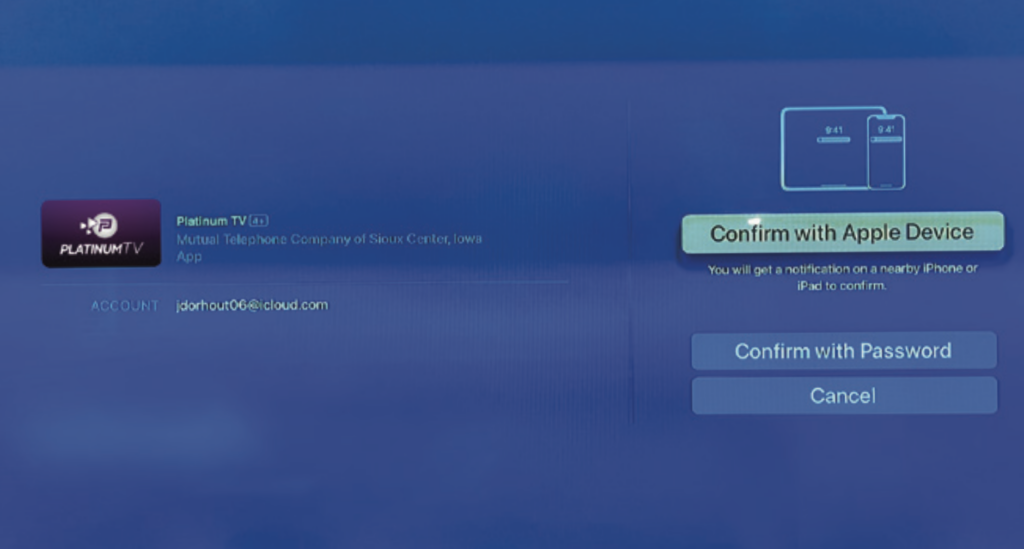
Step 5: You will see an account screen. Choose either “Confirm with Apple Device” or “Confirm with Password”
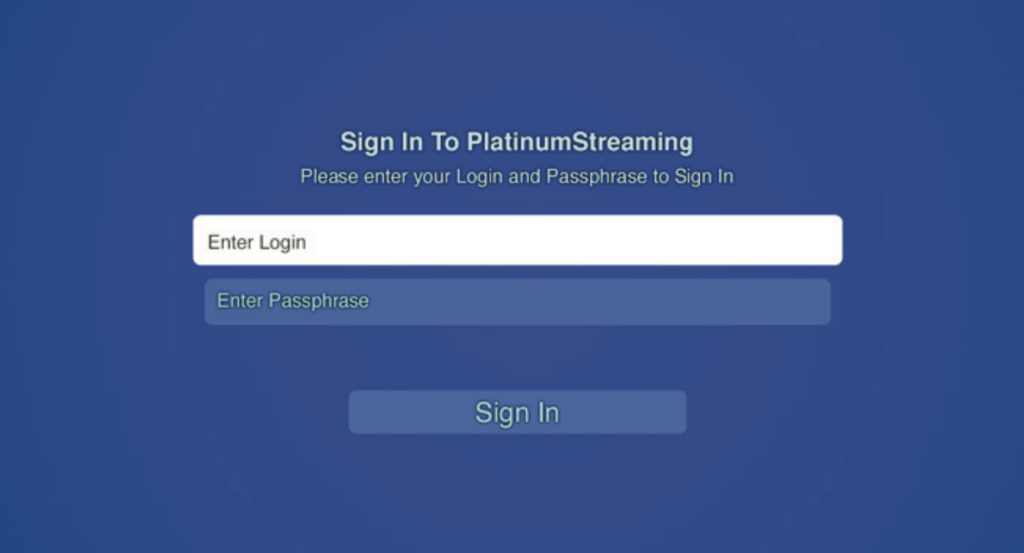
Step 6: You will see a screen asking you to sign in with a Login and Passphrase. Enter the numeric login and passphrase given to you by the Platinum Connect technician or generated from another device and select “Sign In”
Install PlatinumTV on your Amazon Fire TV
Step 1: Press the Home button on your Amazon Fire remote and navigate left to the search magnifying glass
Step 2: Search for “PlatinumTV”
Step 3: Click the “Get” button to download the app
Step 4: You will be prompted for a Login and Passphrase. If you haven’t received these, please contact our office. After entering the Login and Passphrase, press “Save”
Install PlatinumTV on your smartphone or tablet
Use the PlatinumTV app on your phone or tablet to generate codes needed to add PlatinumTV to additional devices.
Step 1: Navigate to the app store on your phone or tablet or scan the QR code below
- Apple App Store

- Google Play Store

Step 2: Download the PlatinumTV app
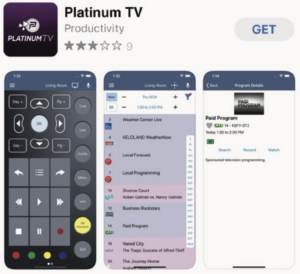
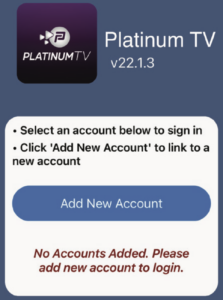
Step 3: Once the app is downloaded, open the app and tap the blue “Add New Account” button
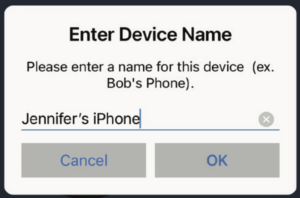
Step 4: You will see a screen asking for a device name. Choose a name that identifies your devices (this can be whatever you want) and tap “OK”
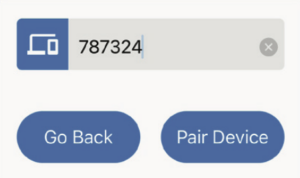
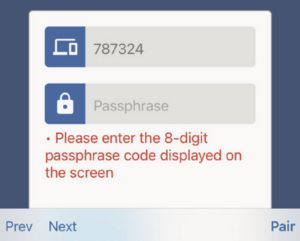
Step 5: You will see a login screen. Enter the numeric login given to you by the Platinum Connect technician or generated from another device and tap the “Pair Device” button
Step 6: You will see another screen asking for a passphrase. Enter the numeric passphrase given to you by the Platinum Connect technician or generated from another device and tap the “Pair” button
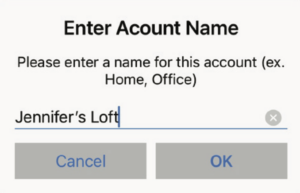
Step 7: Enter an “Account Name” to identify your account (this can be whatever you want). Then tap “OK”
Generate a PlatinumTV login and passphrase
On a phone or tablet:
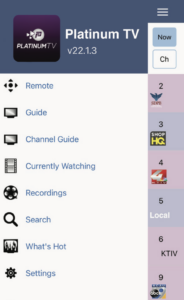
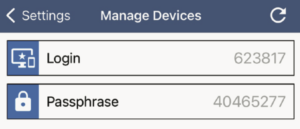
Step 1: In the PlatinumTV app, tap the “Settings” menu
Step 2: Tap “Manage Devices”
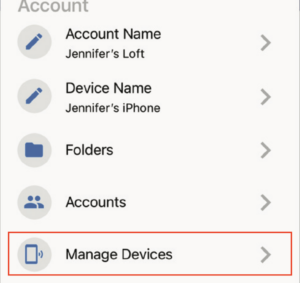
Step 3: You will see two fields at the top of the screen – “Login” and “Passphrase” – with numbers beside each. Enter these numbers to install PlatinumTV on your Apple TV or Amazon Fire TV, or on additional smartphones or tablets.
On Apple TV or Amazon Fire TV:
Step 1: In the PlatinumTV app, navigate to “Account” in the top menu
Step 2: Select “Add Device”
Step 3: You will see two fields – “Login” and “Passphrase” – with numbers beside each. Enter these numbers to install PlatinumTV on your Apple TV or Amazon Fire TV, or on additional smartphones or tablets.
Need further assistance?
Contact our Help Desk at 833-722-3485 or email helpdesk@platinumconnect.com. Note that passphrases are time sensitive – you will only have 5 minutes to use them. If more than 5 minutes have passed, go back to the original device and regenerate new passphrases. Passphrases can be used to register multiple devices as long as it is within the 5-minute window.
Watch PlatinumTV online with channel apps
With a PlatinumTV subscription, you have access to channel apps (WatchESPN, ABC and more) to stream your favorite shows online or via the network’s app.
Note: WatchTVEverywhere access requires subscription to the Family Plus or Family Prime TV tiers.
To sign into the channel apps or websites, you will need to create login credentials. Follow the steps below:
Step 1: Visit www.watchtveverywhere.com and select “Platinum Connect” from the TV provider drop down menu and click “Submit”
Step 2: Click “Register” on the right of the screen

Step 3: Fill out the registration form. You will need two pieces of information to register:
1. Your account number (found on your Platinum Connect monthly bill)

2. The correct spelling of the last name on the account
Step 4: You will be asked to:
- Provide your email address (this can be any valid email address). This will be your username
- Provide a password
Step 5: Click “Submit.” Check your inbox for an email with an activation link from WatchTVEverywhere. Click on the link to complete the registration process.
Your registration is now complete, and you can stream TV using your web browser, tablet, smart phone or streaming device (Apple TV, Amazon Fire TV, etc.)
You can also use your WatchTVEverywhere credentials to login to network websites such as ABC.com. Enter your credentials when asked to “Sign in with your TV provider.”
Apple TV – PlatinumTV User Guide
Add PlatinumTV to your Apple TV
Step 1: From the home screen of your Apple TV, press the Menu button and swipe right to the App Store
Step 2: Select the Search option on the top-level menu and use the on-screen keyboard to type “PlatinumTV”
Step 3: Click “Install” to begin the installation. Once it is complete, you will be prompted for a Login and Passphrase. (If you haven’t received them, contact our office at 833-722-3485.)
Navigating content and lists
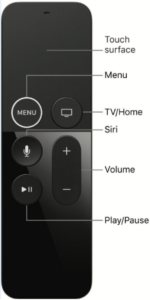
Swipe left, right, up or down on the Touch surface to highlight an app or content item. Onscreen, a highlighted app or content item expands slightly. Press the Touch surface to open a highlighted item.
To return to the previous screen, press the Menu button. To return to the Home screen, press and hold the Menu button.
Watch PlatinumTV
From the Home screen, use the Touch surface to highlight and select the PlatinumTV icon. Swipe up or down on the Touch surface to highlight a channel you want to watch. Then press the Play/Pause button to watch the program.
Channel surfing from a live program
Navigate to the next highest or lowest channel number from a live program by lightly touching the upper or lower area of the Touch surface.
Enter Channel Number Feature
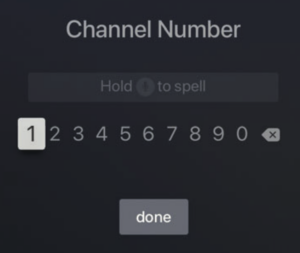
To quickly move to a higher or lower numbered channel in the guide, press the Touch surface twice to open a channel number window. Enter the channel number and press “done” to move to that channel in the guide.
Program Search Feature
From the Tab bar, use the Search feature to find Live, Recorded and Future programs that can be recorded. Swipe right, highlight Search and press the Touch surface to open the program search. Swipe left or right to highlight letters that correspond with the program you are searching for and press the Touch surface to see results. You can also use the voice activation feature by holding the Microphone button and clearly speaking the name of the program you are searching for.
The results will include Live, Future and Recordings of programs that match your search. Use the Touch surface to select a program from the results.
Frequently Watched Programs
If you would like to view one of your frequently watched channels while watching a live program without going back to the guide, swipe down on the Touch surface to see a list of your favorite channels. Swipe left or right to highlight the channel you would like to watch and press the Play/Pause button or the center of the Touch surface to switch to this channel.
Pause, Restart, Fast Forward & Rewind features
Pause Live TV
Use the Pause Live TV feature by pressing the Play/Pause button on your remote. When you want to resume your paused program, press the Play/Pause button again to resume where you left off.
Restart TV
While watching live TV, swipe left on the Touch surface to open the control options and then swipe right to highlight the Restart icon. Press the center of the Touch surface to restart the program. You can also use this feature when you are watching an in-progress recording.

Programs that have the Restart option will display a green Restart icon in the Guide and program description. Due to programming restrictions, some programs may not allow the Restart option. Please contact our office at 833-722-3485 if you have questions regarding this.
Fast Forward & Rewind Features
To use this feature during an in-progress or recorded program, swipe left to open your control options. Swipe right to highlight the control feature that you would like to manage: Pause, Restart, Rewind, Fast Forward, move back to the live program, or activate closed captioning.
On-screen guide management
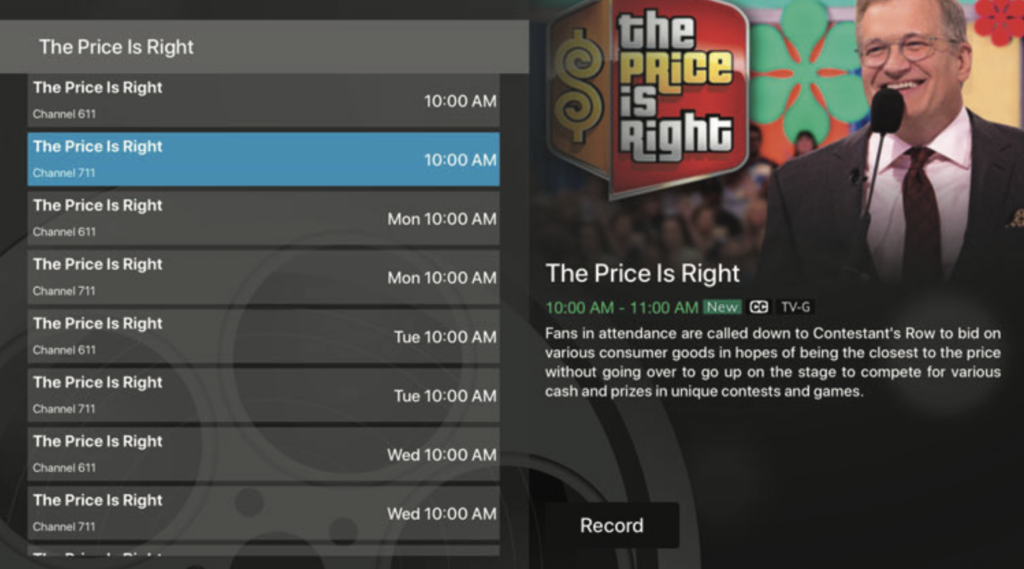
Press the Touch surface on any program highlighted in blue for additional options. Press Watch to view a current-airing program. Swipe down and highlight Record to set a recording for the program. Highlighting and selecting Search allows you to see other times when the program is available to watch or set a recording for the program.
Touch Guide navigation
Lightly touch the upper, lower, left or right areas of the Touch surface to correspondingly navigate through the on-screen program guide.
Recording programs from the Guide
Select a currently airing or upcoming program, swipe to highlight Record and press the Touch surface to create a recording for the program. See the “Recording Your Programs” section of this guide for recording instructions.
Tab Bar
From the program guide, press the Menu button to open the Tab bar. The Tab bar allows you to swipe left or right to access Guide, Recording and Search options.

Record programs
Make a recording
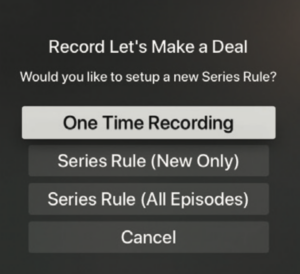
When you select Record, a screen will display with options for setting a series rule for the program. If you do not want to set a series rule, select One-Time Recording. To further manage the recording, go to the Tab bar and select the Recordings option.
Watch recordings
Recordings can be viewed from either the Recordings or Search screen options
Step 1: Select Recordings from the Tab bar to open the Recordings screen
Step 2: Highlight and select Current to open your recorded program list
Step 3: Scroll through the list, select the program you want to watch and press the Touch surface to start watching the program. If there are multiple recordings, scroll and highlight the one you want and press the center of the Touch surface to start watching the program
Step 4: You can also delete the program by swiping right and then highlighting and selecting Delete. You will receive a prompt asking you to confirm the deletion
For any of your Search options, you can see a list of recordings for a specific program by highlighting and pressing Search. Swiping up or down on the remote Touch surface allows you to scroll through all recorded, live, or upcoming programs of an episode or a series. If the highlighted program has been completely recorded, the Watch button will display. Press the highlighted program on your Touch surface to watch the recording. Future programs can be recorded by highlighting and pressing the Record button.
Manage recordings
Current recordings
To watch or delete current recordings, go to the Tab bar above the program guide and select the Recordings option. Highlight Current and press the Touch surface to open the list of your current recordings. From this list, you can either watch or delete your recorded programs by highlighting and selecting the option with your Touch surface. If you choose to delete a program, you will receive a prompt asking to confirm your deletion.
Upcoming recordings
Manage settings for your future recordings
Step 1: From the Recordings screen, highlight Upcoming and press the Touch surface to open the list of upcoming recordings
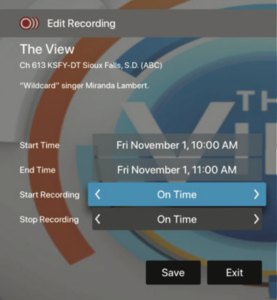
Step 2: Scroll through the list, highlight the upcoming program recording you want to manage and press the Touch surface to open it. If there are multiple recordings, scroll and highlight the one you want to manage, swipe and highlight Edit, and press the center of the Touch surface to open an Edit Recording window.
Step 3: To assure that you don’t miss the beginning of a program, you can change the Start Recording time by highlighting Start Recording and pressing the Touch surface. This will open a screen that gives you options on how early, late, or on time you want a program to begin. Scroll through and highlight your option and press the Touch surface to set the Start Recording time. The Stop Recording feature functions the same way and is beneficial when watching sporting events.
Step 4: Once you have finished your changes, highlight Save and press the Touch surface
Rules
Mange episodes of a series you want recorded automatically
Step 1: From the Recordings screen, highlight Rules and press the Touch surface to open the list of Series Recordings
Step 2: Scroll through the list, highlight a series, and press the Touch surface to open it
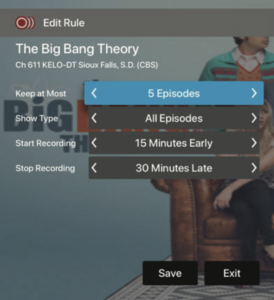
Step 3: An Edit Rule screen will open. Highlight and select Keep at Most to choose a maximum number of episodes of the series you want to keep, or you can choose to Keep All Episodes. Show Type allows you to keep Only New or All Episodes of a series.
Step 4: Once you have finished your changes, highlight Save and press the Touch surface
Amazon Fire TV – PlatinumTV User Guide
Add PlatinumTV to your Amazon Fire TV
Press the Home button and navigate left to the search magnifying glass. Search for PlatinumTV. Click “Get” to download the app. Once installation is complete, you will be prompted for a login and passphrase. (If you haven’t received them, contact our office at 833-722-3485.) Press save.
Navigating content and lists
Pressing left, right, up or down on the remote circle will highlight specific items. Pressing in the center of the remote circle will open a highlighted item. To return to the Home screen, press the Home button. Press the Back button to move back to the previous screen.
Watching PlatinumTV
From the Home screen, use the remote to highlight and expand the PlatinumTV icon and press the center of the remote. This action will open your on-screen program guide. To watch a channel, press up or down on the remote ring and press the Play/Pause button to view a currently airing program.
Channel surfing
While watching a currently airing program, press the top of the remote circle to view the next higher numbered channel. Press the bottom of the remote circle to view the next lower numbered channel.
Enter Channel Number feature
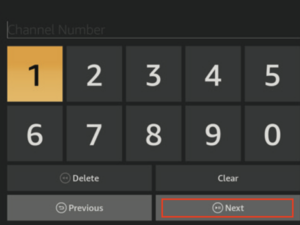
From the program guide, press and hold the center of your remote ring to open a screen that allows you to enter a specific channel number. Then select Next to move to that channel number in the program guide.
Program Search Feature
Use the Search feature to find Live, Recorded and Future programs. From the program guide, press the Back button to open the Tab bar, scroll right to the Search feature, press on the lower part of the remote ring, and then press the right side of the remote ring to open a typing pad. You can manually type in the search by typing in the program you are searching for. To use the voice search, press and hold the Microphone button while speaking the name of the program you are looking for.
The results will be more specific if you type in or pronounce more letters in the name of the program. You can also use the search feature to find specific types of programs, like one with “Today” in the title. To view your search results, highlight Next on the keypad and press the center of your remote. The results will show currently airing or upcoming programs in the top row. Highlight a program and press the center of the remote to select Watch to view the program, or Record to add it to your future recordings. The bottom row will show programs that have been recorded or future recordings. Highlight a recorded program you want to watch and press the center of the remote to watch the program. You can also select Delete if you want to remove the program from your recordings.
Pause, Restart, Fast Forward & Rewind features
Pause Live TV
Press the Play/Pause button on your remote while watching live TV to pause the program. To resume the program, press the Play/Pause button again.
Restart TV
While watching live TV, press the upper part of the remote ring to open a program Play bar. Press the upper part of the remote ring again and scroll right to highlight the Restart button. Press the center of the remote to restart the program from the beginning.
Programs that have the Restart option display a green Restart icon in the program description. There may be programs because of programming restrictions that don’t allow for the Restart function.
![]()
Fat Forward & Rewind Features
To use this feature during an in-progress or recorded program, press the Fast Forward button on your remote control to advance the program. Press Rewind to go back. The progress bar lets you track your movement through a program, and the timer helps you see how far you are from the end of the program.

On-screen guide management
From the Home screen, use the remote to highlight and expand the PlatinumTV icon and press the center of the remote. This action will open your on-screen program guide. Press up, down, left or right to scroll through your channel lineup. Pressing the center of your remote on a highlighted program will open a program screen with detailed information about the program. This screen will also display Watch, Record and Search options.
To watch, use your remote to highlight the Watch button and press the center of your remote. To Record a program, highlight the record button and press in the center of the remote ring. See the Record your Programs section of this guide to learn more about recording programs. Choose the Search feature if you want to see future dates and times that this program will air or programs that have been recorded or are scheduled for recording.
Recording programs from the guide
Select an upcoming program, press the center of your remote, highlight the record button and press the center of your remote to make a recording of this program. See the Recording your Programs section for recording instructions.
Tab bar
From the program guide, press the Back button on your remote to open the Tab bar. The Tab bar allows you to scroll left or right to access the Guide, Recording, Search, and Settings options.
Adding new devices to your service
Before you add a new device to this service, go to Settings in the Tab bar from an activated device, scroll down and highlight Add Device. Press the center on your remote to generate a Login and Passphrase for the new device. Follow the directions at the beginning of this guide for adding this service to your new Amazon device, and use the displayed login and passphrase when you are prompted to active this service.
Quick Guide
During a recorded or live program, press the lower part of the remote ring to pull down a menu list of your most recently watched channels. Scroll left or right to choose a new channel and press the center of your remote to watch it.
Record programs
Make a recording
When you select Record, a screen will display that gives you options for setting a Recording Series rule for a program. You can record only new episodes, all episodes, or select a one-time recording. To further manage a recording, go to the Tab bar and select the Recordings option.
Watch recordings
Recordings can be viewed from either the Recordings or Search screens. Select Recordings from the Tab bar to open the Recordings screen. Here you will see a list of your Current Recordings. Scroll through the list, highlight the program you want to watch, and press the Play/Pause button to start watching the program. If there are multiple recordings, scroll and highlight the one you want to watch and press the Play/Pause button to start watching the program.
From any of the Search options, you can see a list of readings for a specific program by highlighting and pressing on the Search button. This screen will display a list of current or future scheduled broadcasts of this program in the top row. Scroll down to the second row to highlight the list of recorded programs. If the highlighted program has been completely recorded, press the Play/Pause button on your remote to play the recording.
Watch in-progress recordings
To watch an in-progress recording from the beginning, use the Restart feature for the best experience.
Manage recordings
Current recordings
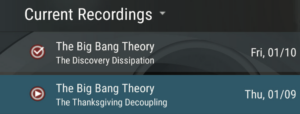
To watch or delete current recordings, go to the Tab bar and select the Recordings option. This screen will display the list of your recorded programs. Scroll up or down and press on the highlighted program that you want to manage. Scroll up or down to highlight a program and press the Play/Pause button to watch the program. The checked red circle to the left of the program indicates that it has not been watched, while programs with a red play button have been partially watched. Press Play/Pause on a partially watched program to view the program where you left off. From this list you can either watch or delete your recorded programs by highlighting the Watch or Delete option. If you choose to delete a program, you will receive a prompt asking to confirm your deletion.
Future recordings
Use the Future Recordings feature to manage settings for your future recordings.
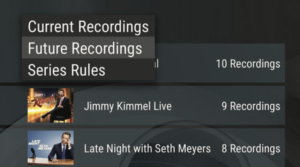
Step 1: From the Recordings screen, press the center of your remote twice. From the dropdown, choose Future Recording to see a list of programs you have scheduled for recording.
Step 2: Scroll through the list, highlight and press the center of your remote to open a Future Recording you might want to manage.
Step 3: To assure that you don’t miss the beginning or ending of a program, highlight Edit and press the center of your remote to open a Recording Options screen. Highlight and press the center of your remote to edit the Start and End Recording times for the program. Scroll up or down and press the center of your remote to adjust the time when you want your recording to start or end.
Step 4: Once you have finished your changes, highlight Save and press the center of your remote to save the changes.
To delete a Future Recording, highlight Delete and press the center of your remote to receive a prompt asking to confirm your deletion.
Series rules
Use the Series Rule feature to manage episodes of a series that you want recorded automatically.
Step 1: From the Recordings screen, press the center of your remote twice. From the dropdown, choose Series Rules to see a list of series programs you have scheduled for recording.
Step 2: Scroll through the list and highlight a series that you want to manage. Highlight Edit and press the center of your remote to open a Recording Options screen.
Step 3: Scroll up or down and press the center of your remote to choose Recording Type, Keep At Most, Start Recording, or End Recording options.
Recording Type lets you keep All Episodes or Only New Episodes. Keep at Most lets you choose a maximum number of episodes that you want to keep of the series, or you can choose to Keep All Episodes.
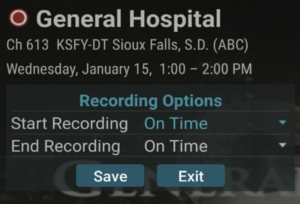
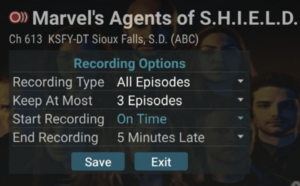
The Start and Stop Recording times option works the same was as it does in Future Recordings. Once you have finished your changes, highlight Save and press the center of the remote. You can also delete all the Series Rules for a program by highlighting the Delete button and pressing the center of the remote. This only deletes the Series Rules and does not delete the Series Recordings.
Platinum Set Top Box User Guide
HOW TO: See what’s on TV
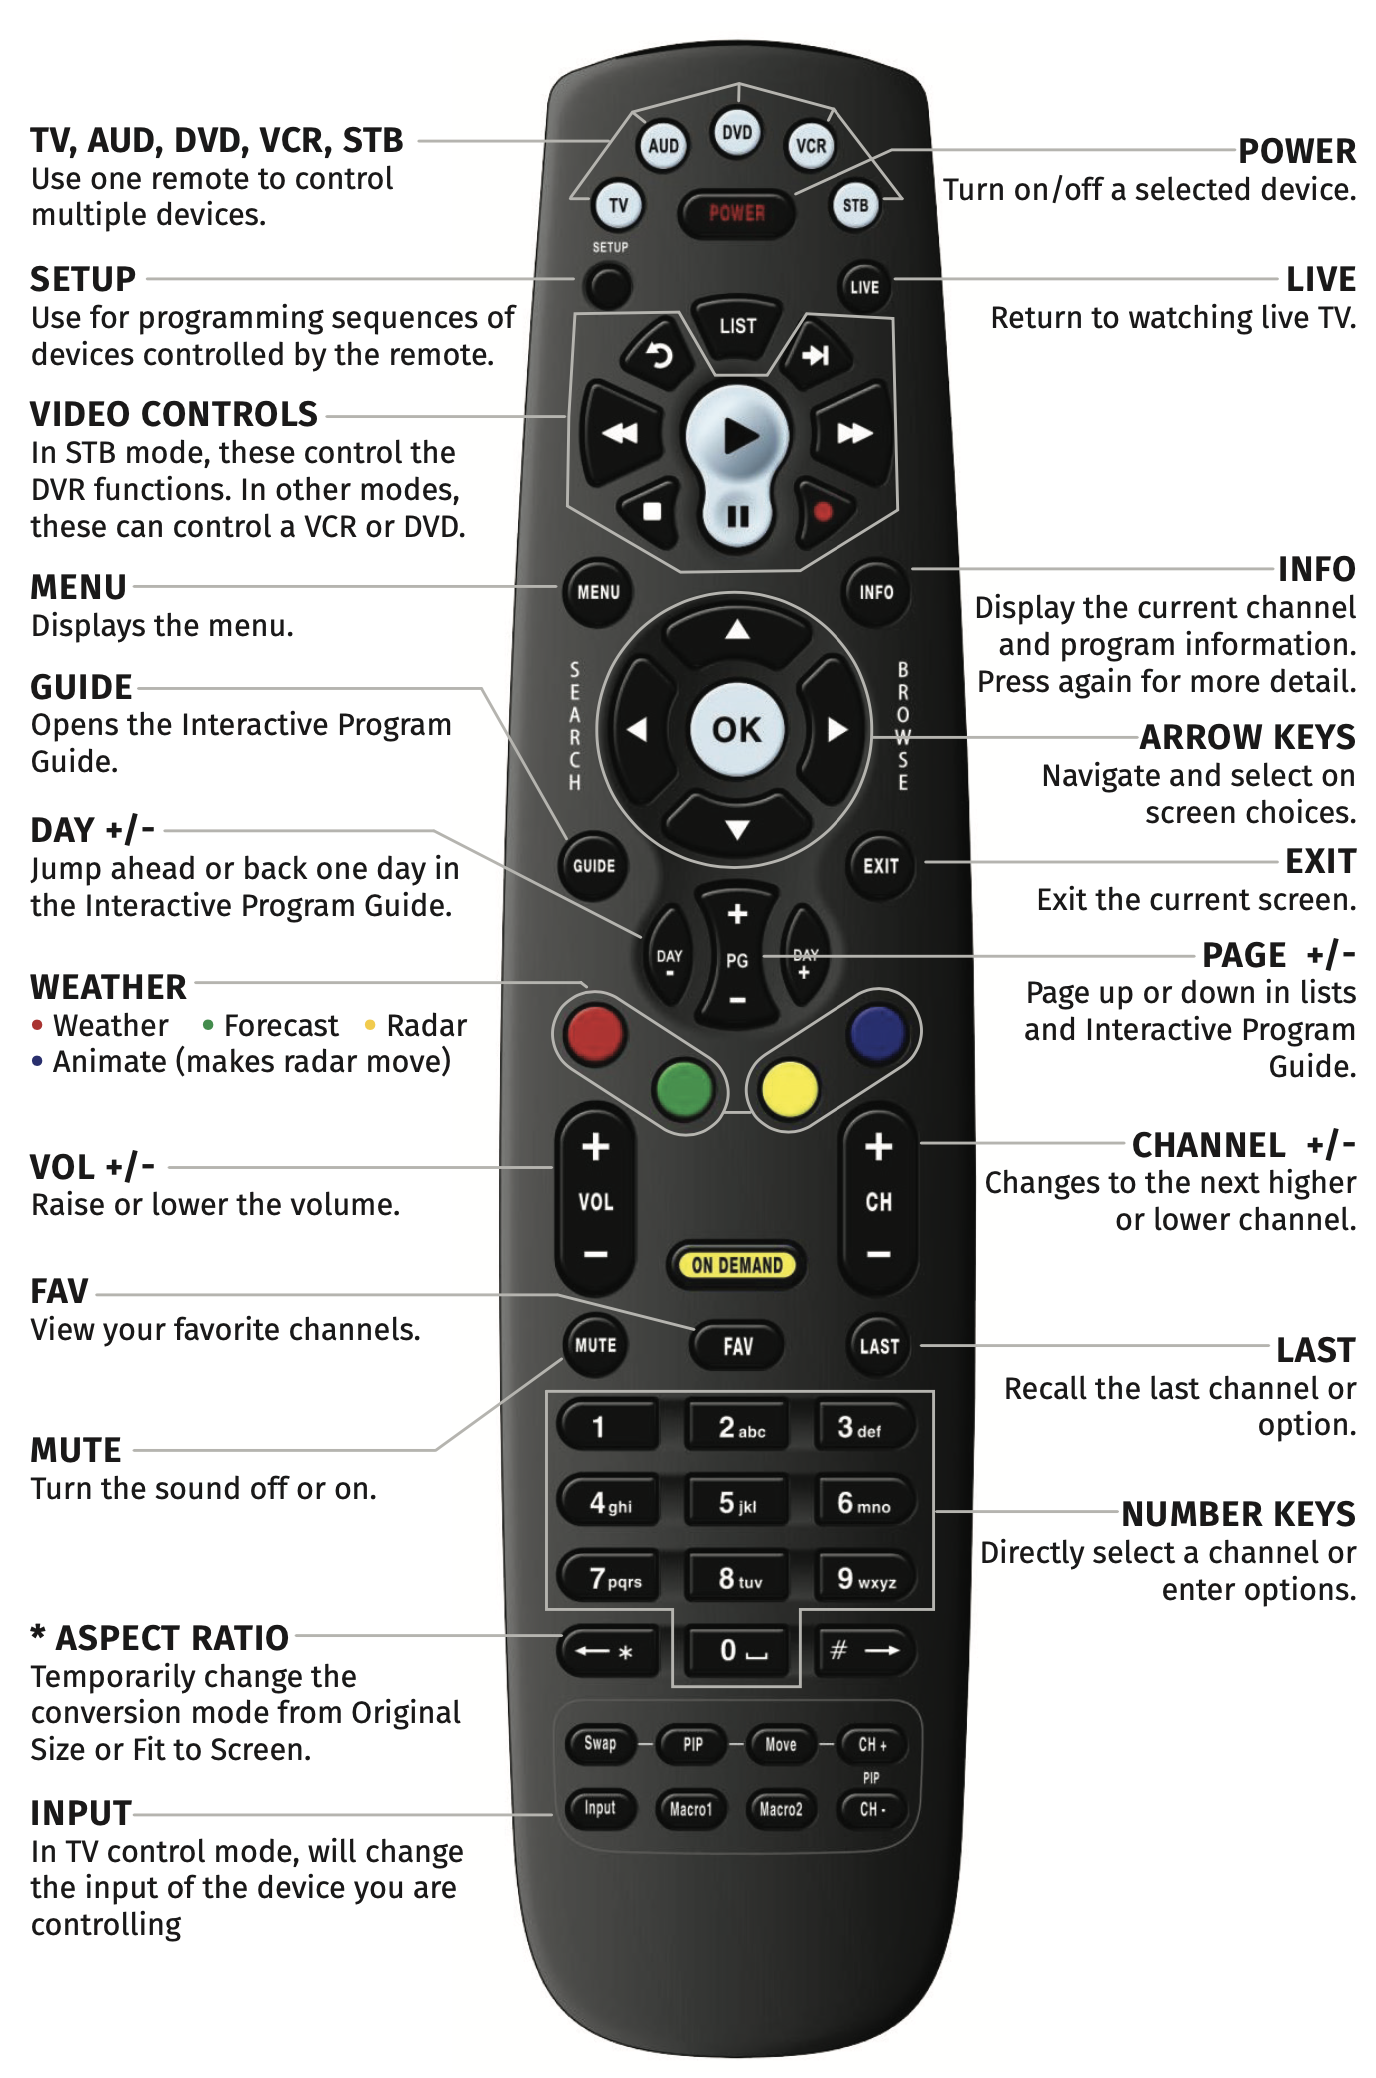
When you first to turn on the TV, there are three ways you can see what is currently showing: the OK button, the INFO button, or the Browse (right arrow) button.
Channel Guide
The Channel Guide is your on-screen tool to see what is on TV and allows you to surf channels while still watching a program.
Press the “Guide” button on the remote – Information about the program you are tuned displays at the top of the screen along with indicators showing whether:
- A program is in HD
- A program is a new episode
- The broadcast is in HD
- The program is available for Pay Per View purchase
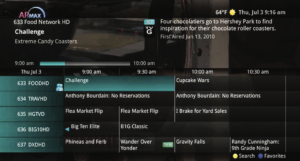
Move through the Guide one channel at a time using the up/down arrow buttons on the remote. As you do this, a description of the highlighted program will display at the top of the screen. Or, press the “Channel +” and “Channel –“ buttons to scroll through the channels more quickly.
To browse through the Guide using a Favorites list, press the blue button or the “FAV” button. The list name will appear at the bottom of the screen. Keep pressing the blue button to scroll through different Favorites lists.
To exit the Guide, press the “Guide” button a third time or press the “Exit” button on the remote.
Search for a program
While viewing any program (while not in the Guide or other menus), press the “Search” button (left arrow) on the remote. This will display a search window where you can enter the first few letters or words in the program title.
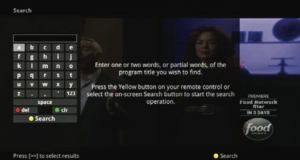
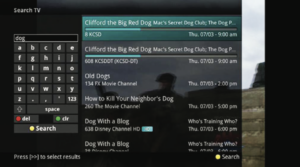
Use the arrow buttons on the remote to highlight letters and press the “OK” button to select a letter. When you have entered the text, arrow down to “Submit” and press “OK” or press the yellow button to start the search.
If there is a program in the search results that you would like to record, you can schedule a recording. Use arrow buttons to highlight the program and then press “OK” or “Record” on the remote. Follow the steps to schedule a recording. You may also continue to search for more programs by the same name.
Record programs
Record what you’re watching
If you are watching a program and decide you want to record the remainder of the program, you can easily start a recording. While watching a program, press the “Record” button on the remote. Choose whether it is a one-time recording, a series recording, or select “Cancel” to not set a recording. Customize your recording selections for start and stop time and which folder to save the recording to.
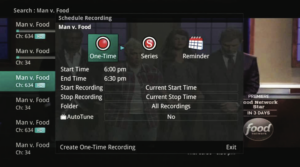
The Reminder function may also be selected from this screen. Select the Reminder function if you would like your television to remind you:
- When the program is going to air
- When a new episode of the program is going to air
- Each time a program will air
You may set the reminder for 1, 2, 3, 4, 5, 10 or 15 minutes prior to the program start. You can also choose to have your TV automatically tune to the channel when the recording starts.
A red circle will briefly display in the top right corner of the screen indicating you are recording the program.
If you decide to stop recording the program before it is complete, press the “Stop” button and choose from the options regarding how to save the partial recording. The options are:
- Continue Recording – does not stop recording the program
- Stop Recording and Keep – save the recording for future viewing
- Stop Recording, Keep and Protect – saves the recording and protects it from automatic deletion
- Stop Recording and Delete – deletes the recording from memory

Create a one-time recording
From the Guide, highlight the program you want to record and press the “Record” button on the remote. The recording options will display.
Choose to create a one-time recording.
Use the arrow keys to customize start and stop times, a folder to save the recording to, and auto tune preferences.
Arrow down to “Create One Time Recording” and click the “OK” button on your remote.
A red circle will display in the guide indicating the program will record.
You can find the recording in the Future Recordings list.
If you change your mind and decide against recording the program, with the program highlighted on the guide, press the “Stop” button on the remote and the red circle will be removed, indicating the program will not record.
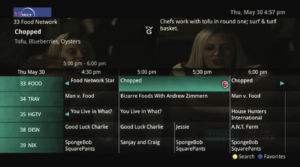
Record a live event (live sporting event, award show, etc.)
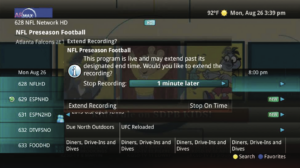
Recording a live event is similar to recording any other program. However, since there is a chance of a live event running longer than originally scheduled in the programming guide, you have the option to record up to one hour longer to ensure you record the entire event.
Step 1: From the Guide, highlight the program you want to record and press the Record button on the remote. The recording options will display.
The DVR recognizes from the program guide that this is a live broadcast and warns you that it may extend past the designated end time.
Step 2: Use the left/right arrow keys to choose the Stop Recording option. Choose a 15-minute, 30 minute, or 60 minute extension time.
Step 3: Arrow down to Extend Recording and press OK on the remote.
Record a series
If you have found a program that you would like to record in the Guide, highlight it and press the Record button on the remote. The recording options will display.
Arrow over to select Series and press OK on the remote.
The Series Recording Options will display:
- Choose how many episodes to Keep at Most at any given time. Options are 1-10 or All Episodes. Use left/right arrow buttons to make your selection
- Choose the Show Type you wish to record. You may choose to record All Episodes of a program or Only New Episodes
- Choose when to start recording. You can begin ‘on time’ when the program is scheduled to begin, or use the left/right arrow buttons to choose 1, 2, 3, 4, 5, 10, 15, or 30 minutes early.
- Choose when to stop recording. You can stop ‘on time’ when the program is scheduled to end, or you can use the left/right arrow buttons to choose 1, 2, 3, 4, 5, 10, 15, 30, or 60 minutes late.
- Choose the folder you want to save the recording to. By default, the folder will be ‘All Recordings’ but you may choose another existing folder or create a new one
- Select the room you would like the Series Rule to apply to (room must be within the Whole Home Group)
- Select Yes or No for the AutoTune feature
- Arrow down to Create Series Recording and press OK on the remote to save your changes
To cancel your changes, press the EXIT button or highlight Cancel and press OK on the remote
A red circle with an ‘S’ will display in the guide indicating the program is part of a series recording
Watch recordings
Step 1: Press the List button on the remote to access the list of recorded programs
Step 2: Use the up/down arrow buttons to choose the folder containing the recorded program you wish to watch
Step 3: Press the Play button on the remote to begin watching
If the program is one that you had previously viewed and stopped in the middle, you will be asked if you would like to resume watching from where you left off, if you would like to restart from the beginning, or if you would like to exit and return to the Recordings List.
As you watch a program, you have the ability to Fast Forward, Rewind, Pause, Replay, Jump Forward, Jump Backward or Stop the program.
Step 4: When you reach the end of the program, you will be asked if you would like to delete the recording. Select either Yes or No.
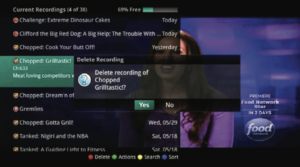
Delete a recording
Step 1: Press the List button on the remote to access the list of recorded programs
Step 2: Use the up/down arrow buttons to choose the folder containing the recorded program you wish to delete
Step 3: Press the red button to delete the recording or group of recordings. Or, press the green button to access the Actions menu and then choose Delete.
You have the option to cancel the process.
Save your favorites
Create Favorites Lists to surf within a specific set of channels. By default, your set top box has grouped channels into several pre-set Favorites lists.
Step 1: Press the Menu button to access the Main Menu.
Step 2: Highlight Settings. Then use the arrow buttons to highlight Edit Favorites. Press the OK button
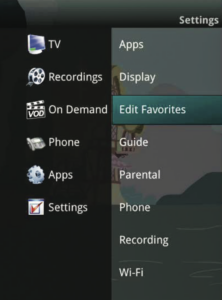
Step 3: If you are not already in a ‘New List’ by default, arrow right to access a New List. All available channels will display.
Step 4: Use the up/down arrow buttons on the remote control to move through the list of channels. When you are on a channel you want to add to your list, press the OK button to mark it as part of this Favorites list.
Step 5: To name the list, press the yellow button on the remote. Use the arrow buttons to move through the letters on the screen. Press the OK button on the remote to choose a letter.
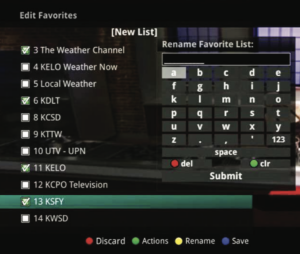
Step 6: When you have named your list, arrow down to select Submit to accept your name.
Step 7: To Save your Favorites list, press the blue button on the remote and then press the OK button
Step 8: To discard a Favorites list, press the red button on the remote. Press the Exit button on the remote to leave the menu
Restart TV
Restart TV allows you to restart a TV program that is already in progress
- Flexibility – Watch TV programming on your schedule
- Convenience – Restart a show already airing by the press of a button
- Catch Up – Use Restart TV to record a show – pause, rewind, and fast forward
Restart TV programming is indicated by the green and white Restart icon in the Browser bar. You can also highlight the program in the on-screen program guide and press the green button on the remote to restart and watch from the beginning.

*Restart TV is not available on all channels
HOW TO: Adjust display settings and closed captioning
Press the Menu button on your remote and select Settings. To change how the set top box displays specific items, arrow to the right, highlight Display, and press the OK button. Typically, these items are set at the time of installation and are not changed.
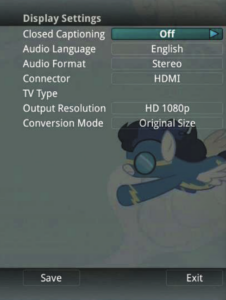
- Turn Closed Captioning On or Off
- Set the Audio Language to Descriptive Audio, Canadian Descriptive Audio, English, Spanish, or French
- Set Audio Format to Stereo, Dolby Digital, or Dolby Digital +
- Change your Connector settings to Coaxial, Composite, S-Video, Component or HDMI
- Set the TV Type to either 16:9 or 4:3
- Select the Output Resolution for the TV
- View the setting for Conversion Mode, Original Size or Fit to Screen (this may also be changed temporarily by pressing the *button on the remote)
TV Equipment
HOW TO: Program the Platinum Universal Remote to control other devices
The Platinum set top remote is a “universal” remote, meaning it can be programmed to operate various brands of one or more types of electronic devices.
Program your remote to control your TV:
Step 1: Manually turn ON the TV that you want to set up on the remote
Step 2: Press and hold the Setup key until the TV key blinks twice
Step 3: Press and release the TV key. The TV will stay lit
Step 4: Find your TV and brand from the chart below and note the Digit Key assigned to your brand. Press and hold down the Digit Key for your device/brand while pointing the remote at the device
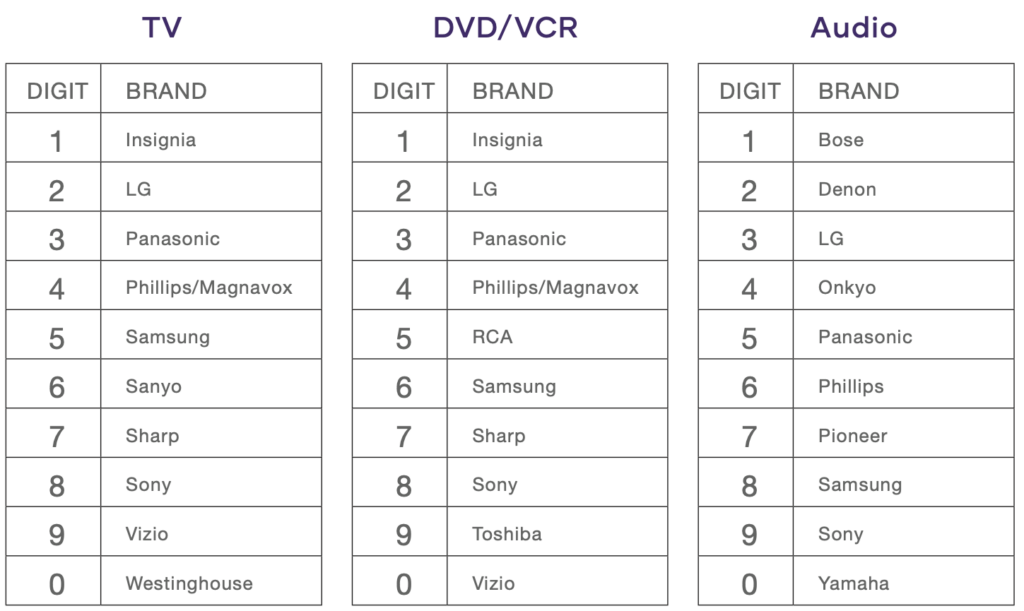
*If your model of device is not on this list, please refer to Searching for your code
Step 5: Let go of the key when your device turns OFF. Setup for that device is complete
Unlock the default settings to make AUD, DVD and VCR buttons programmable:
The AUD, DVD and VCR mode keys have a default setting, which means they are automatically set to the set top box. If you would like to program these mode keys to your devices, follow the instructions below to unlock the default setting.
Step 1: Press and hold Setup until the mode key blinks twice
Step 2: Type 992
Step 3: Press the mode key (AUD, DVD, VCR) you desire to program twice
Step 4: This will remove the set top box mode and a new Audio, DVD or VCR code can now be programmed
Step 5: Follow steps 1-5 of the “Program your remote to control your TV” section above, replacing the word “TV” with the name of the mode key you just unlocked
HOW TO: Program the Master Power key
The Potenza ST Remote has a unique feature that allows you to sequentially turn up to five of your home entertainment devices on or off with a single key.
*Note: The Master Power (POWER) only works in Set Top Box (STB) mode. If it is not programmed, only the set-top box will turn on or off. In any other mode, pressing Master Power (POWER) once will turn the selected device on or off.
Programming the Master Power key
Step 1: Press and hold the Setup key until the last device key blinks twice.
Step 2: Enter 995
Note: The LED will blink twice after any three-digit programming sequence is entered correctly
Step 3: Press Power once
Step 4: Press the device keys you want in the power sequence (STB, TV, AUD, DVD, VCR)
Step 5: Press and hold the Setup key until the last device key blinks twice (3 seconds). To play back the power sequence, press the Power key while in STB mode.
Clearing the Master Power key
Step 1: Press and hold the Setup key until the last device key blinks twice
Step 2: Enter 995
Note: The LED will blink twice after any three-digit programming sequence is entered correctly
Step 3: Press the Power key and release
Step 4: Press and hold the Setup key until the STB key blinks twice (3 seconds)
Setup codes for TVs
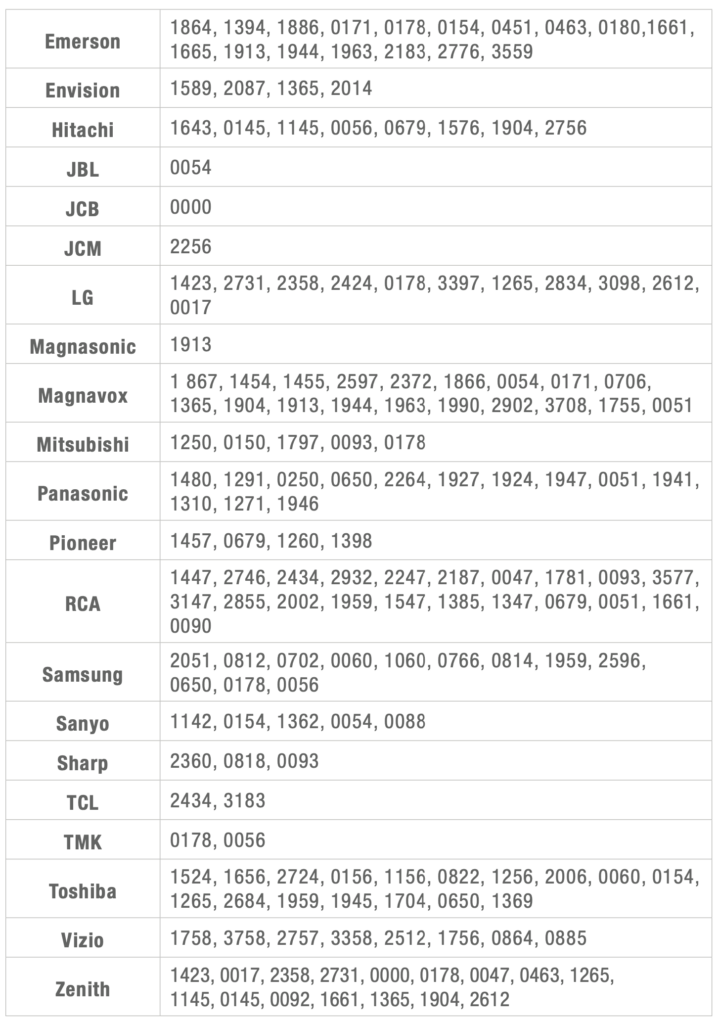
Searching for your code
If your home entertainment device does not respond to the Potenza ST Universal Remote Control after trying all the codes listed for your brand, or if your brand is not listed at all, try searching for your code. To search for a code for your TV:
Step 1: Turn ON your TV
Step 2: On the remote, press TV once; it will blink once. Then press and hold Setup until the TV key blinks twice
Step 3: Type 991. The TV key will blink twice
Step 4: Aim the remote control at the TV and press Power once
Step 5: Press and release the CH+ key continuously, then stop when the TV turns off
- Note: In the search mode, the remote will send IR codes from its library to the selected device, starting with the most popular code first
Step 6: Press Power. The TV should turn on. Then, press Setup once to lock in the code. The LED will blink 9 twice to indicate that the code is saved
- Note: If the TV does not turn on during Step 6, slowly press and release CH- to go back through the codes, then press Setup when the TV turns on
Step 7: To search for the codes of your other devices, repeat Steps 1-6, substituting the appropriate key (TV, AUD, DVD, AUX or STB) for the device you are searching for
Checking your code
If you set up your remote control by searching for your device code, you may need to find out which four-digit code is operating your equipment.
To find out which code is operating your TV:
Step 1: On the remote, press TV once; it will blink once. Then press and hold Setup until the TV key blinks twice
Step 2: Enter 990. The TV key will blink twice
Step 3: To view the code for the first digit, press 1 once. Count the number of times the TV key blinks. If a code digit is 0, the selected mode key will not blink.
Step 4: Repeat Step 3 three more times for the remaining digits. Use 2 for the second digit, 3 for the third digit, and 4 for the fourth digit
Note: It may be helpful to write down these numbers for reference
Step 5: To check for other device codes, repeat steps 1-4, substituting the appropriate key (e.g., TV, AUD, DVD, AUX, or STB) for the device you are checking
Common Errors
HOW TO: Switch inputs on your TV (“No Signal” TV error)
Do you ever see the “no signal” message on your TV screen? Here’s how to fix it:
When you see the “no signal” message on your TV screen (instead of your TV programming), it means that your TV is on the wrong input.
What are inputs?
Your TV can be connected to multiple devices. Each device, such as your set top box, a DVD player or video game system, is usually connected to a different input on the TV. You can change the input on your TV to select each device.
How to change the input on your TV:
How to change the input can vary based on your TV brand and specific model, but it is usually accessible from a button on the TV’s remote control.
Step 1: Using the remote that came with your TV (NOT the remote that Platinum Connect gave you with your box), look for a button with one of the following names or something similar:
- Input
- AUX
- Source
- Video Source
- Component
- HDMI 1
Step 2: Press the button that matches one of the items in the list above. Depending on your TV, continuously pressing the button may cycle through available inputs or display a menu with a choice of inputs. If it brings up a menu, you can likely use the remote’s arrow keys to highlight a choice and select that input.
- The inputs often have basic names such as Video 1 and Video 2, names reflecting the type of connection such as HDMI 1 or Component 2, or descriptive names such as Cable Box or DVD. On some TVs, you can create custom input names.
Step 3: Continue trying each input listed on your screen. You may need to try several inputs before you find the correct one. You will know you are on the correct input when you see your TV programming return.
*For exact steps that detail how to change the input for your specific TV brand, contact your TV’s manufacturer or refer to the user manual for your TV.

